Here it is, as promised, my MacGyver-style home hydroponics.
Unfortunately, as I’m prone to do, I built this thing in a obsessive-compulsive rush and didn’t pause to document the process so we have to make due with photos of the finished product and my descriptions of how it was built. Let’s begin with an overview.
Let’s say we want to grow a small tomato plant (or something similar) with a minimum of fuss and using only items of little or no value that are laying about. Now a wick system would probably be the easiest way to do this, so of course I dismissed that out of hand. No sense in making the problem too easy to solve, right? Instead let’s take it a step up – DWC. This requires some kind of air pump, and barring some MacGyver’ed version of an air pump we’ll have to actually get one of those, but we’ll dismiss that for the moment. (Besides, a basic Wal-Mart air pump only runs about $10.)
Parts List:
2L bottle
Empty yogurt cup (style with an outward upper lip and narrow bottom than top)
Spare airline tubing
A bit of aluminum foil (perhaps 1 square foot)
Duct Tape (can’t MacGyver without it)
Super glue or silicone sealant
Some kind of hydroponic medium
A plant
Tools:
a knife (preferably a Swiss Army knife like MacGyver’s, but as long as it’s sharp any knife will do.)
a drill (preferably with a drill bit slightly smaller than your airline
a pair of pliers
a needle or pin
a source of fire
Assembly:
 So the first order of business is to create a substitute for the airstone. If you’ve got a lot of extra airline laying around (say a couple feet or so) skip down a bit and see what I suggest you do instead of what I did.
Anyway, you can make a decent amount of bubbles with just the airline sticking into the bottom of the reservoir, but we can do better. Get your airline, fire, pliers, and the needle/pin. Now you want to heat up one end of the airline a bit without really burning it or melting it too much. Just get it soft. Then mash down on that end with the pliers, sealing the end completely. Then stab that end over and over with the pin around the last inch or so.
This makes our “air stone” by allowing a few dozen little sites for the air to escape as small bubbles.
You can kind of see the “airstone” at the bottom of the bottle, at right.
Fill up your bottle with hot water to soften the glue on the label, and strip the label off. I like to pull down on it like I’m trying to peel off a sock, but it doesn’t really matter how it gets done as long as it gets done. Empty the bottle afterwards.
 Next, drill a hole in the side of the bottom of the bottle using a drill bit that’s slightly smaller than the airline so you get a nice, tight fit. It may fight tight enough that you don’t need to seal it, but you ought to anyway. (Especially if, like me, you get a couple small radial cracks in the plastic as you drill through.) To make drilling easier, I recommend leaving the cap on so the bottle is firmer.
If you have extra airline, as I mentioned above, drill your hole before you crimp the end shut. Then feed the airline through the hole and out the top of the bottle, then do your crimping and stabbing full of holes stuff that way. You can then draw the line back out, pulling the “airstone” into the bottom of the bottle.
If you don’t have extra airline (like me) it won’t matter how neatly you drill the hole since you’re going to have to cut a slit out from the hole to let the crimped end fit through. (You can’t feed it through from inside since your hand won’t fit down into the bottle.)
Once you have the “airstone” roughly centered at the bottom of the bottle, glue all the cracks/gaps/edges with superglue and/or silicon sealant so you won’t have any leaks. I recommend filling the bottle once that’s done and dry to make sure it’s water-tight. Keep in mind that water will seep into the airline and drip out that way, so keep the outer end elevated to prevent that. (You can see in my pictures below that I have it taped up for this very reason.)
Now the reservoir is built, we need to create some way for a plant to be installed. We could simply make a collar for the plant to fit into the neck of the bottle (a little piece of sponge would work decently well, cut a groove in one side, slide the crown in, then “cork” the bottle with the whole thing. That will work, but be harder to refill.
 Instead, take your empty yogurt cup, turn it upside down, and fit it over the nozzle of the bottle as straight as you can. Then mark the bottle around the cup where the bottle and cup meet. Use the knife to cut along that line, just below it so the hole is slightly bigger than the cup. It should now fit down into the top of the bottle and be supported by the lip of the cup.
Next, drill a bunch of holes in your yogurt cup, sides, bottom, etc. You don’t need to turn it into complete swiss-cheese, but you want plenty of holes for roots. Now we’re almost done.
 The final step of construction is to make the bottle light-tight. Light + hydroponic solution = bad microbes (fungus, algea, and other crud). So we don’t want light getting in. If you have metal tape that works best, but most people don’t have that just laying around. Duct-tape and aluminum foil, however, are commonplace. First tear your aluminum foil into narrow strips as long as the bottle and about an inch narrower than the tape. To do this I took a ruler, pressed it down hard on top of the foil, and then pulled the foil upward in a smooth motion to tear it neatly in a straight line. This doesn’t have to be perfect, but the neater the better.
 Tear yourself some strips of tape a bit longer than you need, and affix the foil carefully down the center of the tape. Then cut one end off flush with the end of the foil (this end will match cleanly with the top edge of the bottle that way) and apply it as smoothly and cleanly to the bottle as you can. Repeat this with just enough overlap to ensure the entire bottle is encased not only in tape, but aluminum foil as well. Duct tape doesn’t block light, foil does. If you like, leave a narrow gap in the tape in one spot so you can see the water level inside. If you want to do that, the spot where the airline is installed is a good place to do it.
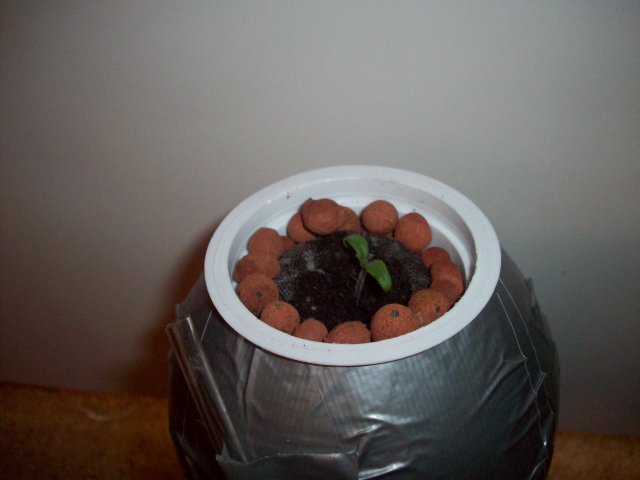
 Now you can fill your cup with the hydroponic media, put in your plant, and hook up your air pump.
My system has a Micro Tom hybrid tomato plant started in it. It’s a type of tomato plant specially bred to remain very, very small. This system is much too small for most any other kind of tomato plant. If you’re interested, I got my tomato seeds from Totally Tomatoes, and here’s a link to the Micro Tom. I haven’t grown one before, but it’s supposed to grow to be only 6-8″ tall, which means it should be the perfect size for our 2L DWC.
So far my little seedling hasn’t gotten its roots past the cup, so I haven’t had the airline attached (it’s basically just a wick system right now with water in it.) It will need aeration soon, though.

Hi HydroMan, this setup looks like something I can do, thank you for the great pics and steps. I do have one question about this setup. You said that until the roots come thru the cup you won’t hook up the airline. I haven’t read thru all your posts about the hydroponics, so please forgive me for my ignorance, but how much water did you put in this bottle, and how high should it stay? Do you only aerate the water once the roots reach the waterline?? Do you add any fertilizer to the water?
Part of that is just laziness. The way my big DWC is set up at the moment it’d be annoying to plug this small unit into the air system for the big one. So, to avoid that, I just didn’t start aeration.
Nothing would be harmed by starting it earlier (and it would probably be smarter to do so.)
Once the roots are in water, they must be aerated or you’ll end up killing the plant.
I put enough water in the bottle so that the bottom of the yogurt cup was submerged about a quarter of an inch, which allows the medium in the cup to take up water via wicking.
The water level didn’t drop noticeably because the plant just can’t drink that much when it’s that small.
Don’t add fertilizer until the plants are older – a good rule of thumb is to wait until they’ve put out their first set of true leaves. The seed comes with all the energy a plant needs to get started, if you add much more before it’s used that up you’ll “burn” the plant.
Oh, by the way, that Micro Tom has put out it’s first set of true leaves now and will be going to it’s new home shortly. What’s cool is that the leaves of the Micro Tom are absolutely tiny – perfect miniature tomato leaves. It looks like a bonsai.
Ooo, pictures please!!!!
HydroMan, do you think black electrical tape would work to keep the light out??
Probably. I haven’t tried it so I can’t say for sure.
I’d have a couple concerns though. For one that tape can be pretty “gummy”, which would mean the DWC would probably be a little sticky on the outside, prone to peeling, and so forth.
Also, it’s rather narrow tape, so you’d have to use a lot to cover a 2-liter. With enough overlap to make sure there aren’t cracks of light getting through it would be a pretty painstaking task.
The easier thing would be to just get some of that spray paint that’s formulated for plastics and put a couple coats of that on (at least one coat dark, then a lighter color if you want it.) Of course that gets away from the “things you have at hand” unless you’ve got some of that paint just sitting around.
How is the tomato doing? I’d love to see photo’s of it growing other than what you have here on this post. BTW, this is the most PERFECT idea for demonstrating DWC on a small portable scale. I’m doing a demonstration in March on Hydroponic gardning for indoors & out so this is will work PERFECTLY!
Thanks. That tomato plant was actually a gift so I don’t know how well it worked out.
I recently pulled what feels like every muscle in my back, so I haven’t been getting much done around here but I’m planning to start some tomatoes in DWC shortly. Just need to find the time.